Importing CAD 3D Models
Finally, since release 1.3 it’s possible to import STEP models to Coppers 3D part library. This allows you to build detailed, photorealistic 3D models of your board even if you use fancy, non common parts. All you need is a STEP model of your part.
Where to find parts, legal information
3D STEP models are available from manufacturers websites and websites like 3dcontentcentral.com and tracepartsonline.net.
As these two websites have been a source for the common parts library that comes with Copper you are fine to use parts from these websites, too. We have an agreement with them that their parts may be used in Copper.
If you download the STEP model from other sources please make sure that you have the right to use a STEP model. If you find a model at i.e Github or internet forums make sure you read the license provided with it. If there is no license, then you don’t have the right to use it. Then please ask the author!
Workflow
The workflow of importing parts is very easy and just involves a few steps. This is just a short list. Every step is described in the slideshow below.
- Switch to 3D board viewer
- Select the part/package you want to add a 3D part
- Try to find a 3D part in the library (perhaps it’s already available in the library)
- If not, switch to the Inpector 3D Part tab (new in 1.3), you’ll see the footprint in a small 3D view and various settings
- Click on the “Import CAD model” button
- Choose the STEP file on your hard disk that you want to import
- A new window will be opened and a progress bar shows the import progress. Loading STEP-models can take some time (couple of minutes with complex parts!)
- Once the STEP model is loaded you’ll see a 3D view with the footprint laid on ground and the part positioned somewhere in this view (sometimes they are quite a bit off as it depends on the export options when the STEP model has been created)
- Use the controls on the right side of the window like orientation and position to rotate and position the 3D part on your footprint. You can manipulate the camera position of the 3D few the same way you do in the 3D PCB viewer
- Add meta data like a name, description and choose a category where to put the part in the library. As this part should be found by others make sure you give it a nice name and a description. Use the description to give credit to the Author! You may also add values to the specs like number of pins, mounting type, etc. This makes it easier for other users (and yourself) to find the part later again.
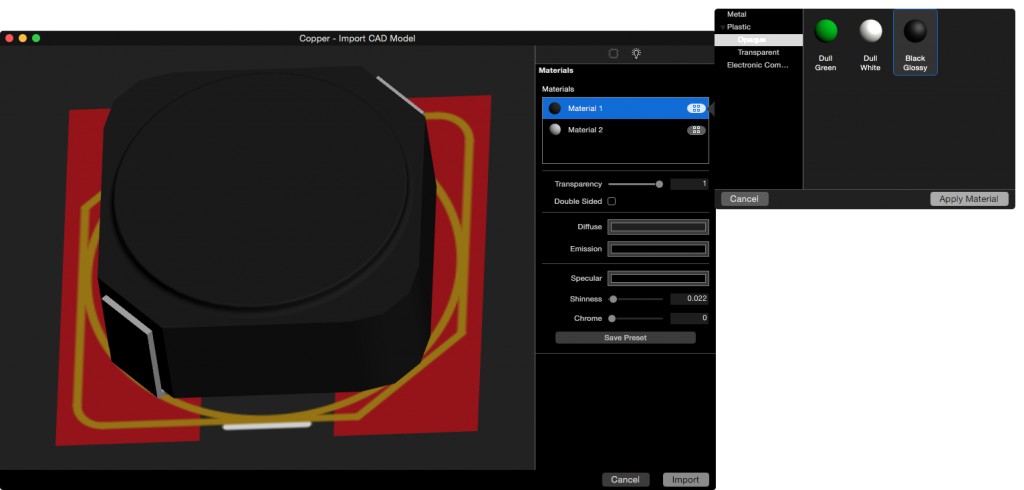
- Once the part is positioned it’s time to apply nice looking materials to it. We want photorealistic 3D board representations, so we need them to look nice. Select the material inspector tab in the import window.
- When importing the model, Copper groups parts of the model by the the color of the face saved in the STEP file. An IC will most likely have two materials, one for the body, and one for the pin. They typically have different color and can thus be easily distinguished in the 3D view.
- Select a material and change its properties like diffuse and specular (highlights) color, shininess, transparency, and a few others.
- You can also choose from a presets library by clicking on the small icon right of each material in the list. Choose from standard materials like silver/gold pin, IC body and standard plastic materials.
- You can also create your own material preset. Click on the “Save Preset” button once you are happy with your material, choose a folder and a name. The material will be saved in the cloud and will be available for other users of Copper, too. So please make sure you give it a nice name and only save materials that aren’t already available in the library.
- Once you are happy with your new part click on import.
- The part, meta data, thumbnails and images are uploaded to the library. Once that is done, the window will close and the new part will be assigned to the part/package you selected before.
This sounds like a lot to do. But it’s really quick as the UI helps with positioning and assigning material presets. The effort we put in the library in the first place will make “profit” the way down the road as we will only have to make the effort once, but gain the speed of finding nice, photorealistic parts with ease the next time we use the part.
I really insist in you to invest a few minutes in a nice material setup and meta data. This way all Copper users will be able to profit from the work of others and nobody has to do the work regarding 3D models twice. This is the primary mission of Copper. Making electronics more efficient and easy to use. And the best way for efficiency is to make sure work that can be shared is only done once.
Private parts
When importing a part there is an option for sharing the part with the Copper community. This option is active by default as I think it makes sense to share work that will be done by various others and that is no competitive advantage but just a time killer for everyone. I mean finding a nice 12 pin double row SMD right angle shrouded pin header can be a real pain. If you have done it, it just doesn’t make sense that anyone else in this situation has to go through that again. You on the other side will perhaps find a part that someone else has uploaded with nice meta data and materials. As this take and give only works if everyone does it the share option is active by default. Of course there might be parts that you created yourself and that are proprietary to you. I.e. if you have created the next generation graphic chip and use Copper to show it on a reference PCB it makes sense to keep that chip private (al least until it’s released ;-)). If we see that a lot of common parts are marked as private we will make private parts a paid upgrade to prevent misuse from our perspective. But we start in the believe that Copper community sees the world the same we do.
Sharing footprint for future use
The other option in the import dialog is sharing the footprint. By default Copper gathers all info it finds about the part you selected before, i.e. the footprint, symbol, assigned Octopart info (from part sourcing) like the part number, manufacturer and uploads these infos alongside the 3D model. All these info is compiled into a JSON style info package and uploaded to the Copper cloud. It will not be used for anything at the moment. But it will be used in the future.
As you most likely know we are working on making Copper a full EDA suite. That means you will be able to actually create schematics and PCB layouts in Copper. It’s a long way towards this goal, and we’ll approach it step by step with each release. But we stay to our vision: Making it easy, making it efficient, making it fun. And one of the most frustrating things in electronics today is creating part footprints. My vision is that while you work on your existing PCBs today and uploading 3D parts for it, you will also fill the Copper library with nice, reliable footprints, symbols and part infos.
When Coppers create features will be released, Copper users will find an extensive, well structured part library with complete parts, i.e. symbol, footprint, connections, a photorealistic 3D model, part infos like manufacturer and part number, pricing and availability and even specs. Created with love by the Copper community! If you find such a part in the library you just have to drag and drop it to your schematics or layout and everything is setup with one click! And not only for common parts, but even for the most fancy parts.
That’s the vision. And I need your help to make that true. Please leave the “Embed footprint” option enabled when you upload your 3D model and share your work with others! Thank you very much.
Importing a CAD model step by step
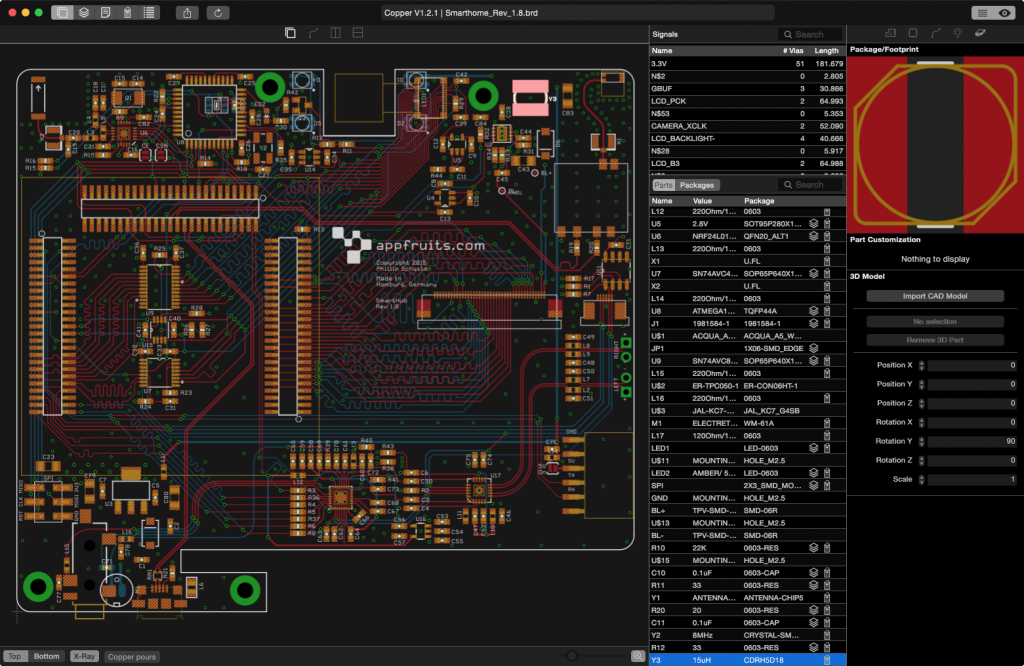
Select part with the part browser or by clicking on the part in the canvas view. Make sure the 3D part inspector is activated as shown in this screenshot. It’s the third tab with a small 3d representation of a chip. Click on the “Import CAD Model” button below the 3D footprint view. Select the STEP file on your hard drive of the part you want to import and click on done/choose.
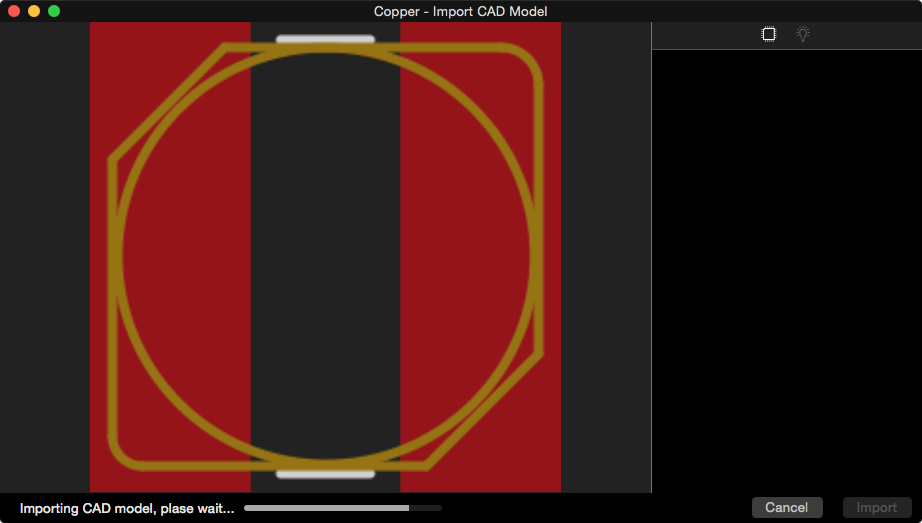
It will take a while for Copper to import the STEP model. More complex parts can take up to a couple of minutes. The import progress is a two step progress, reflected by the progress bar. In the first progress there is no way for Copper to calculate how long it will take so it displays a pulsing bar. This may take some time. When the STEP file is loaded, Copper starts building a 3D model from it that Copper can work with. This process is reflected by a increasing progress bar. After some wait the 3D footprint, the imported 3D part and the inspector on the right side will be set up.
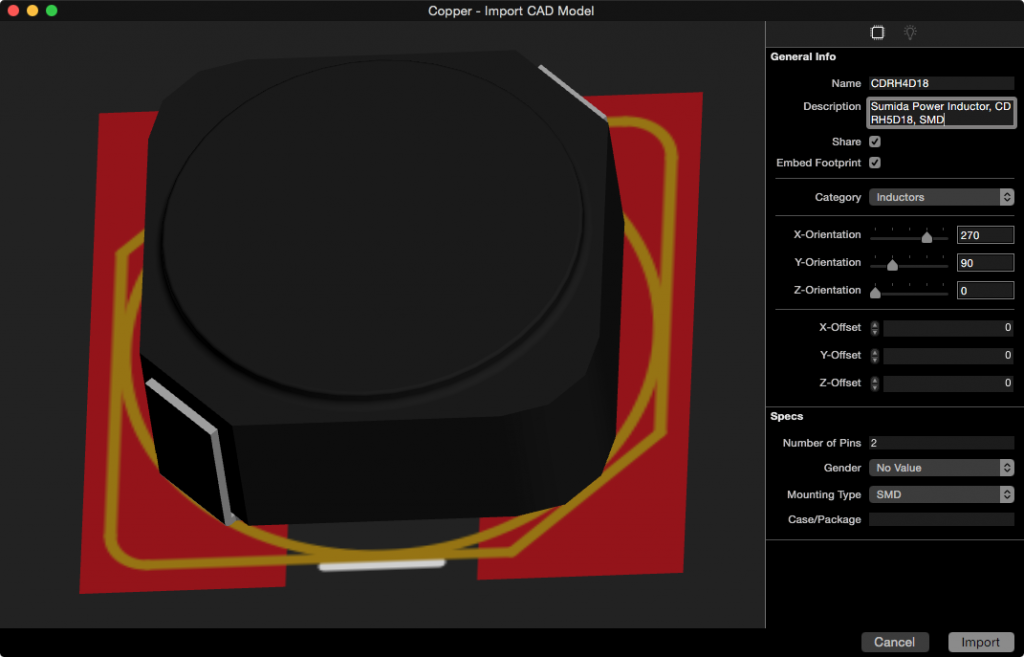
The 3D model is placed somewhere in the 3D view, relative to your footprint. Parts can be quite off as some authors don’t set the origin of the part in the CAD application, but Copper relies on that information. Use the controls and settings on the right side in the inspector like orientation and position to align and position the 3D model to your footprint. You can move the camera and rotate the view the same way as you do in the 3D board viewer.
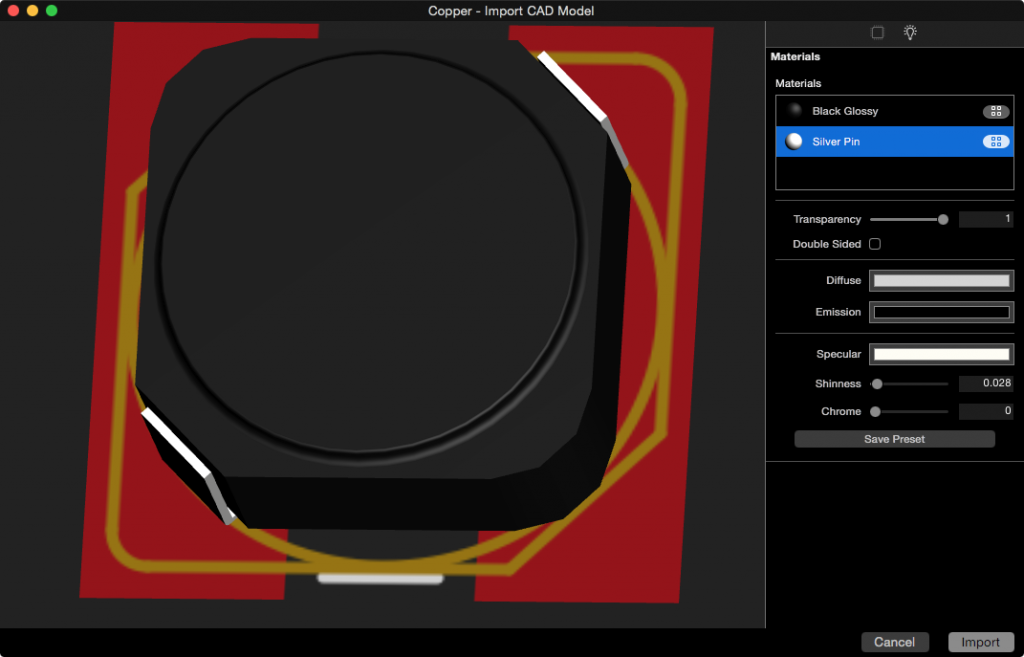
It’s important that you enter a good name, nice description, enter the specs like number of pins and mounting type. You’ll also need to select the category. These settings are entered in the first tab of the import inspector shown on the right side of the window. Once you are done with that, click on the second tab of the inspector showing the material tab where you can setup materials on the part.
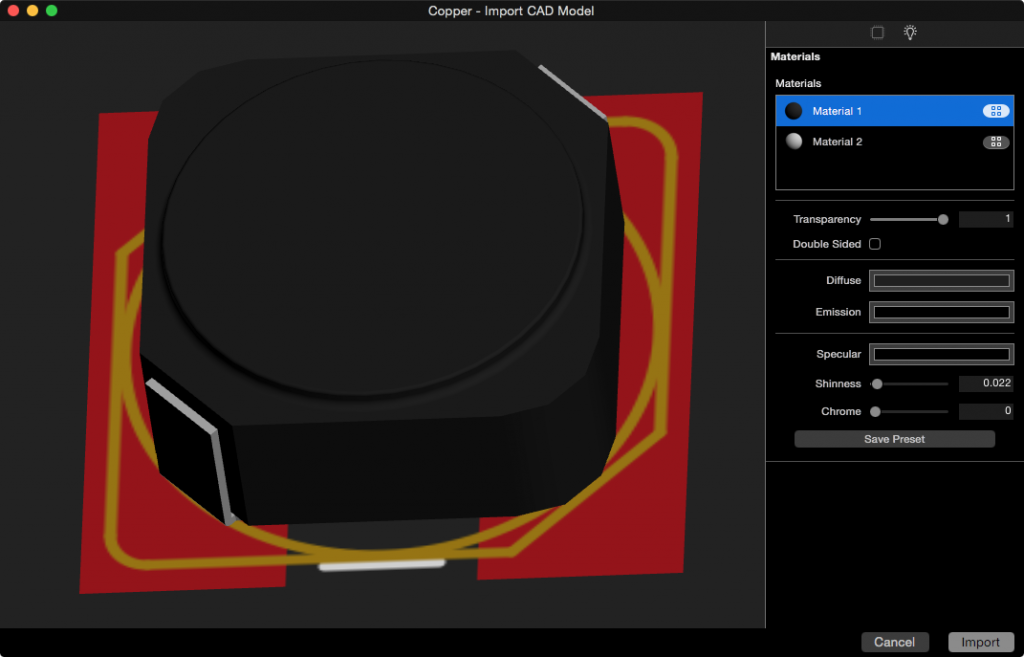
Most parts will have multiple materials. However, there are STEP models where the author did not apply different colors and therefore Copper cannot separate the part (Copper does this with the colors embedded in the STEP model). Then choose a color/material that reflects the part best. Play around with the sliders and settings of the materials. Most of the settings speak for themselves.
You can also choose a material from the material library. This library is shared across all Copper users with a central, cloud based material library. Click on the small icon right of the material name in the list. This opens the preset selector window. Choose a material category on the left (it’s hierarchical), then choose a material from the list at the right side and click “Apply Material” to apply it to your part. If you have created a wonderful material that could be of good use for others, then you can save it as a preset. Click on “Save Preset”, choose a category and give it a name and click on OK. The material is then saved to the cloud and shared with others. Please don’t clutter the library with all sorts of materials. Check if a suitable material exists ini the library before you create your own.
Once you have setup the part with meta data and materials click on import. This may take a while as the part and various data are uploaded to the Copper cloud.
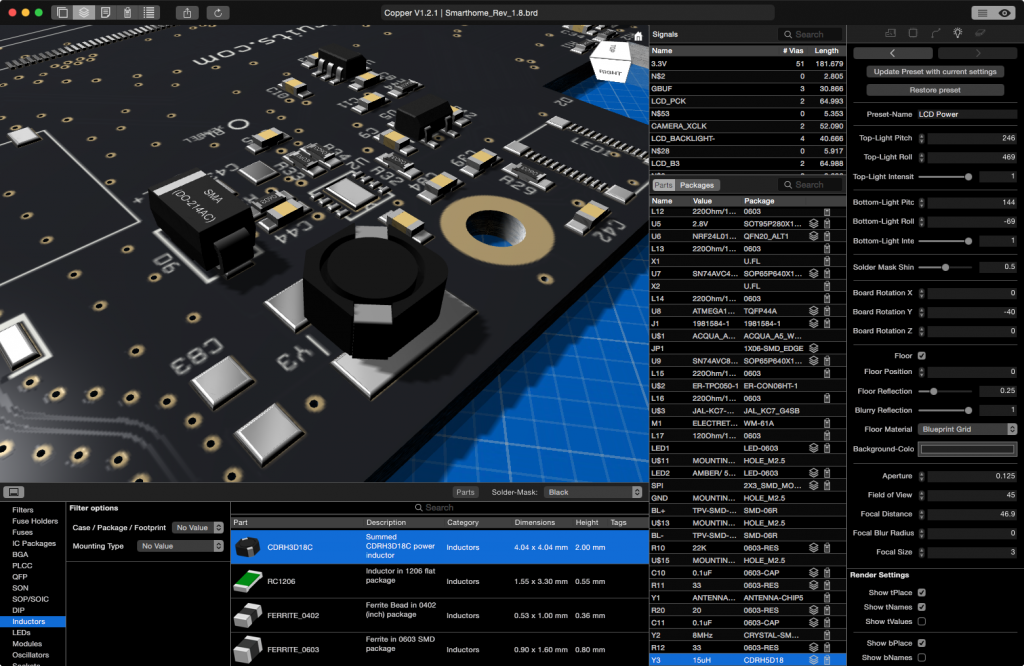
As you can see in the screenshot the part has been added to your board and to the library. Please share your 3D parts and footprints with the community by leaving the options “Share” and “Embed Footprint” enabled in the import dialog.